
If you are running a custom apparel brand, corporate gifting business, or merchandise line in India, you already know the ultimate nightmare: you order 500 premium cotton T-shirts, print your crisp designs, ship them out to excited customers, and two weeks later… the emails start flooding in.
“Boss, after one wash, my Large size fits like a Medium!”
Nothing destroys a young fashion brand’s reputation faster than unexpected fabric shrinkage or skewed side seams. When a customer buys a custom tee from makemyt-shirt.com or your custom store, they expect the fit to stay true wash after wash.
Before you transfer that heavy advance payment to a textile manufacturer or fabric supplier, you must perform a standard T-shirt shrinkage test.
In this comprehensive, practical guide tailored for Indian apparel startups, brand managers, and merchandise buyers, we will walk you through the exact lab-style testing procedure you can perform right in your office or workshop using basic equipment.
1. How Do You Calculate T-Shirt Shrinkage?
Calculating fabric shrinkage isn’t guesswork; it relies on a simple mathematical formula used by textile testing labs across Tirupur, Surat, and Ludhiana.
The Shrinkage Percentage Formula
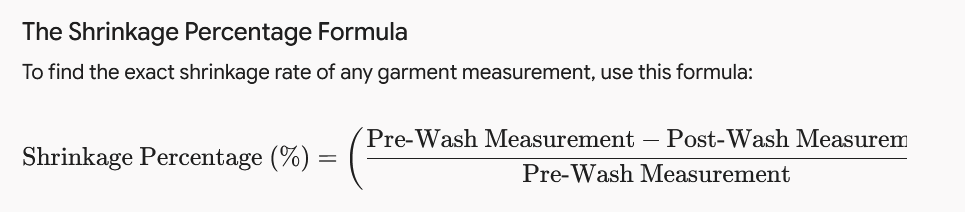
Quick Guide:
- Measure the exact dimension (Length or Width) in centimeters before washing (M1)
- Wash and dry the T-shirt according to your target care label instructions.
- Re-measure the exact same dimension after the garment is completely dry (M2)
- Subtract M2 from M1, divide the result byM1, and multiply by 100
2. Equipment Required for a T-Shirt Shrinkage Test
You don’t need a high-end textile testing laboratory to run an accurate bulk T-shirt wash test. You just need a systematic setup and a few basic tools:
- Measuring Tape: A flexible, non-stretchable tailor’s measuring tape marked in centimeters (cm) and millimeters (mm). Metric measurements give higher accuracy than fractional inches.
- Garment Marking Pen / Tailor’s Chalk: A water-soluble fabric marker or contrast tailor’s chalk to mark measurement anchor points.
- Flat Measuring Table: A smooth, flat surface large enough to lay the T-shirt down completely without any edges hanging over.
- Washing Machine: A standard domestic top-load or front-load washing machine (or the specific industrial wash setup your customer will likely use).
- Laundry Detergent: Standard consumer laundry powder or liquid detergent. Avoid heavy bleaching agents unless testing industrial workwear.
- Drying Setup: Clothesline for air-drying or a tumble dryer (if testing tumble-dry performance).
- Iron: A steam or dry iron to remove post-wash wrinkles without stretching the fabric before final measurement.
- Testing Log Sheet: A printed tracking sheet to record initial, pre-wash, and post-wash dimensions.
3. Where to Measure the Garment (Key Points of Measure)
To get an accurate result from your T-shirt shrinkage test, you must measure specific points on the garment before and after washing. Never stretch or pull the fabric while measuring; lay it completely flat and smooth out major wrinkles with your hands.
       +------------------+  <-- Neck Opening
      / |   Shoulder     | \
     /  +----------------+  \
    /  /                  \  \
   /  /    Chest (A2A)     \  \
  /  /   +--------------+   \  \
 /  /    |              |    \  \
+--+     |              |     +--+
 Sleeve  | Body Length  |    Sleeve
 Length  |              |    Length
         |              |
         +--------------+
1. Chest Width (Armhole to Armhole)
Lay the garment flat. Measure horizontally across the chest, approximately 2.5 cm (1 inch) below the armhole seams, from the left side seam to the right side seam.
2. Total Body Length
Measure vertically from the highest point of the shoulder (HPS)—where the shoulder seam meets the neck collar—straight down to the bottom hem of the T-shirt.
3. Sleeve Length
Measure along the outer edge from the top shoulder seam down to the end of the sleeve cuff.
4. Shoulder Width
Measure horizontally on the back of the T-shirt from the left shoulder seam joint across to the right shoulder seam joint.
5. Neck Opening Width
Lay the collar flat and measure straight across the widest point of the neck seam from seam to seam.
4. Pre-Wash Measurement Procedure
Accuracy at this stage prevents wrong calculations later. Follow this systematic process:
- Condition the Sample: Allow the test T-shirts to rest flat at room temperature for at least 2 to 4 hours after unpacking. Fabrics absorb ambient humidity, which can alter dimensions slightly.
- Lay Flat on a Smooth Surface: Smooth out all wrinkles using light hand pressure. Do not pull, stretch, or pin the fabric.
- Mark Reference Anchor Points: Using your water-soluble tailor’s chalk, make tiny dot marks at your exact measurement points (e.g., exactly 2.5 cm below the armhole). This ensures you re-measure the exact same spot after washing.
- Take Initial Measurements (M1): Record measurements for Chest, Length, Sleeve, Shoulder, and Neck in your testing sheet to the nearest millimeter (0.1 cm).
- Test Multiple Samples: Never rely on a single garment! Test at least 3 samples per fabric batch or color to calculate an average.
5. Washing and Drying Procedure
How you wash the sample determines how reliable your test results will be. Your test condition must mirror how your end customer will clean the garment.
Washing Steps
- Load Size: Place your test sample in the washing machine along with a few dummy garments (like old towels or plain tees) so the machine carries a realistic full load weight.
- Water Temperature: For standard cotton T-shirt wash tests, use normal tap water (approx. 30°C). If you are testing for heavy industrial use, run a hot water cycle (40°C or 60°C).
- Wash Cycle: Run a standard cotton cycle for 45 to 60 minutes with typical laundry detergent.
- Rinse & Spin: Allow the machine to complete its normal rinse and spin cycle to extract excess water.
Drying Steps
- Air Drying (Line Dry): Hang the garment flat over a drying rack or clothesline in a shaded area. Avoid hanging by heavy wet shoulders using thin wire hangers, as this stretches the length artificially.
- Tumble Drying: If your care label permits tumble drying, dry the sample on medium heat until completely dry. Tumble drying causes higher thermal shrinkage due to mechanical agitation and heat.
- Ironing/Pressing: Once fully dry, let the garment rest flat for 1 hour. If it’s heavily wrinkled, press it lightly with a warm iron without pushing or stretching the fabric.
6. Post-Wash Measurement
Now comes the moment of truth in your bulk T-shirt wash test:
- Lay the washed and dried T-shirt back down on the exact same flat measuring surface.
- Allow the garment to relax flat for 30 minutes.
- Locate the tailor’s chalk anchor dots you marked during Step 4.
- Measure each dimension again carefully using the exact same measuring tape.
- Record these values as your Post-Wash Measurements (M2) in centimeters.
7. Shrinkage Calculation Example
Let’s work through a practical real-world example so you can calculate your cotton T-shirt shrinkage percentage confidently.
Imagine you received a sample 180 GSM 100% Combed Cotton Single Jersey T-shirt from your supplier.
Step 1: Record the Data
| Garment Dimension | Pre-Wash (M1) | Post-Wash (M2) | Difference (M1−M2) |
| Total Body Length | 72.0 cm | 68.4 cm | 3.6 cm |
| Chest Width | 52.0 cm | 50.4 cm | 1.6 cm |
| Sleeve Length | 22.0 cm | 21.3 cm | 0.7 cm |
Step 2: Apply the Formula
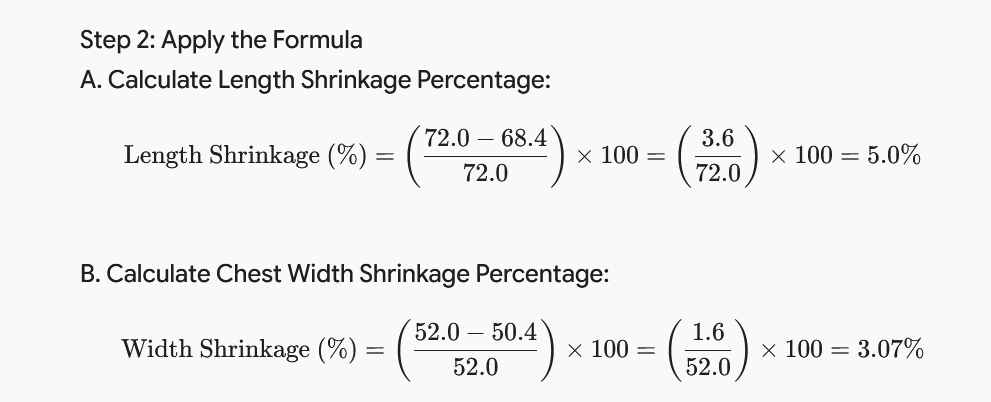
In this example, your T-shirt lost 5% in length and 3.07% in width.
8. Length Shrinkage Versus Width Shrinkage
Understanding how to measure fabric shrinkage requires knowing why length and width react differently during a wash.
+-----------------------------------------------------------------+
|                       FABRIC TENSION IN MILLS                   |
+-----------------------------------------------------------------+
| WARP YARNS (Lengthwise): Pull under heavy tension during knitting|
| RESULT: Higher shrinkage after wash as tension releases (~5-7%) |
+-----------------------------------------------------------------+
| WEFT YARNS (Widthwise): Less tension during knitting           |
| RESULT: Lower shrinkage after wash (~2-4%)                      |
+-----------------------------------------------------------------+
When circular knitting machines produce single jersey cotton fabric, the vertical loops (warp direction) are pulled under continuous mechanical tension. The horizontal loops (weft direction) experience far less pull.
- Lengthwise Shrinkage (Warp Direction): Usually higher (typically 4% to 7% for untreated cotton). When washed, the pulled-out vertical cotton fibers relax back to their natural coiled state, causing the T-shirt to get noticeably shorter.
- Widthwise Shrinkage (Weft Direction): Usually lower (typically 2% to 4%). In some cheap fabrics, a T-shirt might actually get wider as it gets shorter—a phenomenon known as fabric expansion or distortion!
9. What is Spirality or Garment Twisting?
Have you ever washed a T-shirt and noticed that the side seam somehow twisted around toward the front of your stomach? That frustrating defect is called spirality or garment torque.
  Normal Alignment             Spirality / Seam Twist
    +----------+                   +----------+
    |          |                   |          |
|Seam|        |Seam|           \Seam\        \Seam\
    |          |                   |          |
    +----------+                   +----------+
Why Does Spirality Happen?
During high-speed circular yarn spinning and knitting, natural torque builds up inside single-jersey cotton structure. If the fabric isn’t properly heat-set, resin-finished, or compacted during dyeing, the stress releases during washing. The entire knitted loop structure skews at an angle.
How to Measure Spirality
- Lay the washed T-shirt flat.
- Check the distance between the bottom of the side seam and where it should naturally sit straight along the hem edge.
- Calculate spirality percentage:
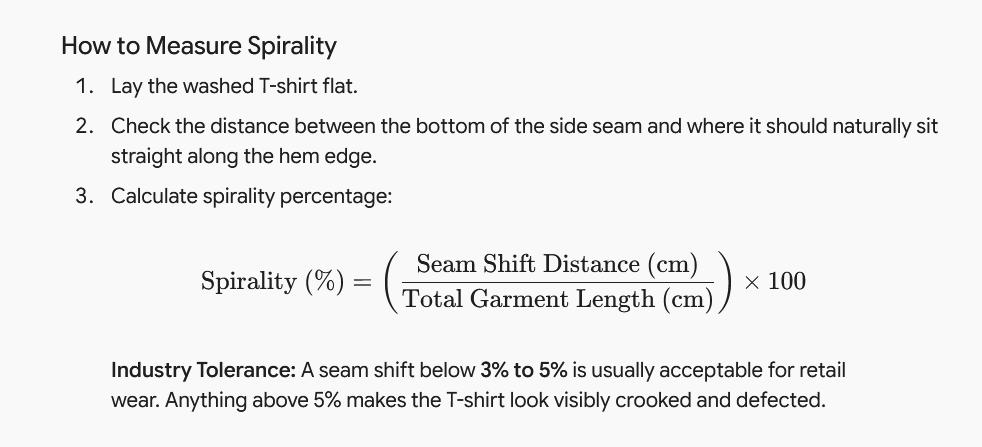
Industry Tolerance: A seam shift below 3% to 5% is usually acceptable for retail wear. Anything above 5% makes the T-shirt look visibly crooked and defected.
10. What Should a Brand Do When Shrinkage is Excessive?
There is no single “universal acceptable shrinkage percentage” for all T-shirts. Acceptable limits depend on your fabric composition, processing technique, and price positioning:
- 100% Carded Cotton (Basic Promo Tees): 5% to 8% shrinkage is common.
- 100% Combed/Compacted Cotton (Premium Streetwear): 2% to 4% shrinkage is expected.
- Polyester/Cotton Blends (PC / CVC): 1.5% to 3% shrinkage (Polyester stabilizes cotton).
- 100% Polyester (Dry-Fit/Sports Wear): Under 1% to 1.5% shrinkage.
If your T-shirt shrinkage test shows values higher than your agreed specifications (for instance, 8% length loss on a premium tee), here is your action plan before approving a bulk production run:
Action Steps for Apparel Brands:
- Demand Pre-Shrunk or Compacted Fabric: Ask your knitter or fabric vendor to use a tubular or open-width compacting machine during finishing. Compaction mechanically pre-shrinks the knit fabric before cutting.
- Opt for Bio-Washing or Enzyme Washing: Bio-washed fabrics undergo enzymatic treatment that smooths out fibers, relaxes yarn stress, and reduces post-wash shrinkage significantly.
- Adjust Patterns (Shrinkage Allowance Addition): If you cannot change the fabric supplier, adjust your cutting patterns! If your test proves a 5% length shrinkage, instruct your pattern master to add 5% extra length to the pre-cut pattern. After the consumer’s first wash, the garment shrinks directly into the intended spec fit!
- Fix Standards in Your Quality Agreement: Never rely on verbal promises. Put a clearly stated tolerance clause inside your purchase order (PO) with the supplier (e.g., “Maximum allowable length/width shrinkage shall not exceed 4% under standard 30°C wash conditions”).
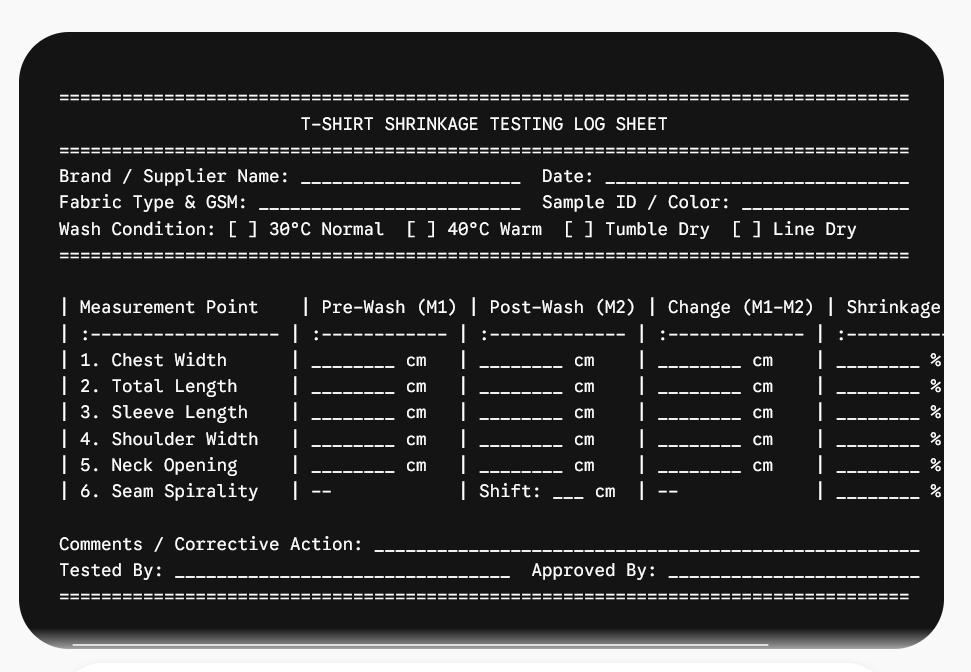
11. Printable T-Shirt Shrinkage Testing Sheet
Copy and paste this structured table into Excel, Google Sheets, or print it out for your quality check (QC) team to record test data efficiently:
12. Frequently Asked Questions (FAQs)
Q1. Is 5% shrinkage normal for a 100% cotton T-shirt?
Yes, for standard non-pre-shrunk 100% cotton single jersey knit fabric, a 5% to 7% shrinkage is fairly typical after the first warm wash. However, high-quality combed and compacted cotton T-shirts stay within a 2% to 4% shrinkage range.
Q2. Does bio-wash prevent T-shirt shrinkage completely?
Bio-washing helps relax surface fibers and reduces surface pilling, which stabilizes the fabric to some extent. However, bio-wash alone does not prevent shrinkage completely. Mechanical compacting during fabric finishing is what actually controls dimensional stability.
Q3. Why did my T-shirt get shorter but wider after washing?
This happens due to structural loop relaxation in single jersey fabrics. The vertical loops contract heavily in length, forcing the knit construction to push outwards sideways. This is common in cheap, un-compacted low-GSM fabrics.
Q4. Should I test every color batch before ordering bulk apparel?
Yes! Darker dyed fabrics (like Black or Navy) often undergo longer liquid dye processes than light colors (like White or Melange), altering their structural relaxation. Always run a bulk T-shirt wash test on at least one dark and one light shade per fabric quality.
Q5. Can DTF or Screen Printing affect shrinkage?
The printing process itself doesn’t cause fabric shrinkage, but the heat curing process (curing machine or heat press at 160°C) can cause slight thermal shrinkage before the shirt is even washed. Always measure your blank sample before and after heat curing!
Final Thoughts for Apparel Brands
Testing your blanks before taking bulk delivery is the difference between a amateur merch supplier and a trusted custom apparel brand. By setting up a quick 24-hour T-shirt shrinkage test routine at your office, you save lakhs of rupees in returned inventory, customer complaints, and damaged brand equity.
See Also
- How To Shrink A Shirt Without Ruining The Design?
- SHRINKAGE TEST AT HOME BY SIMPLE WAY
- T-Shirt Sample Approval Checklist: 25 Checks Before Bulk Production
- Combed Cotton vs Carded Cotton T-Shirts: Quality, Price, and Printability Compared
- T-Shirt Costing Formula India: Calculate Cost Per Piece for 50, 100 and 500 T-Shirts